2020-12-5 백기선님 더자바 테스트(1) 강의정리 Junit
Junit
- 자바에서 가장 많이 사용하는 테스트 프레임워크, 자바8이상을 필요로 한다.
- 스프링부트 2.2부터는 Junit5가 기본적으로 의존성에 추가된다.

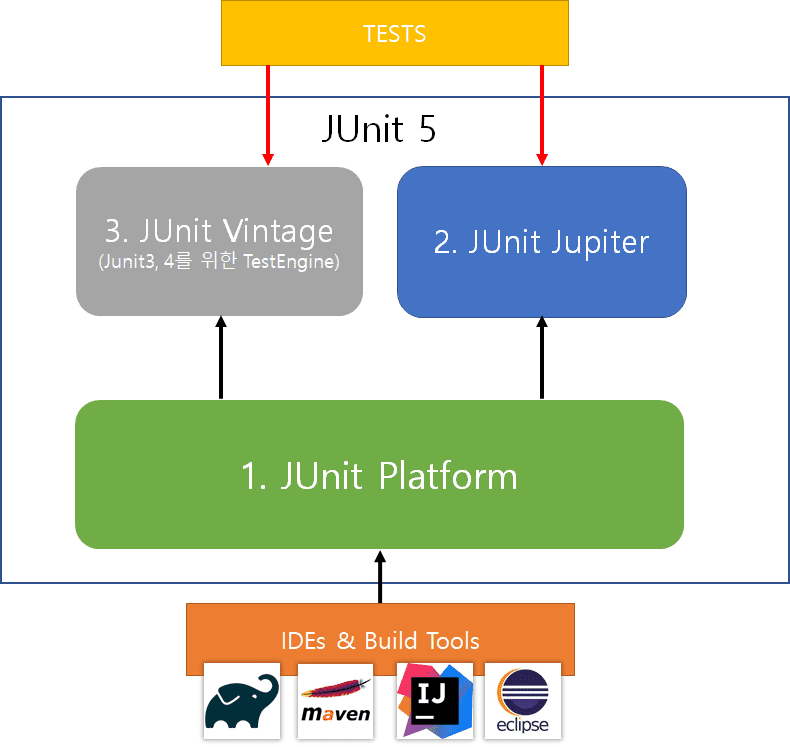
- 출처 : https://goodgid.github.io/Junit5-Intro-Structure/
- Platform : 테스트를 실행하는런처 제공. TestEngine API 제공
- Jupiter : TestEngine API 구현체로 JUnit 5를 제공
- Vintage : Junit 3,4를 지원하는 TestEngine 구현체
시작하기
-
클래스를 만들고 클래스 이름위에 cmd + shift + T를 누르면 적절한 위치에 테스트클래스가 생성된다.
-
Junit5부터는 클래스, 메서드가 public일 필요가 없다.
-
@BeforeAll, @AfterAll를 할때는 static 선언을 해야한다.
-
package me.jimmy.test; import org.junit.jupiter.api.*; import static org.junit.jupiter.api.Assertions.assertNotNull; @DisplayNameGeneration(DisplayNameGenerator.ReplaceUnderscores.class) class StudyTest { @Test @Disabled public void disabledTest() { System.out.printf("실행 안되는 테스트"); } @Test public void create_new_study() { Study study = new Study(); assertNotNull(study); } @Test @DisplayName("스터디 이름 명명 테스트 어노테이션") void create1() { System.out.println("create1"); } @BeforeAll static void beforeAll() { System.out.println("before All"); } @AfterAll static void afterAll() { System.out.println("After all"); } @BeforeEach void beforeEach() { System.out.println("before Each"); } @AfterEach void afterEach() { System.out.println("after Each"); } }- @disabled : 해당 테스트는 실행하지 않는다.
- @BeforeAll, @AfterAll는 모든 테스트를 실행하기 전후로 1번만 실행된다.
- @BeforeEach, @AfterEach 각 테스트를 실행하기 전후로 실행된다.
테스트 이름 표기하기
- @DisplayNameGeneration
- Method, Class레퍼런스를 사용하여 테스트 이름을 표기
- 기본 구현체로 ReplcaeUnderscores제공
- @DisplayName
- 어떤 테스트인지 테스트 이름을 보다 쉽게 표현하는 어노테이션
- @DisplayNameGeneration보다 우선 순위가 높다.
Assertion
@Test
void create_new_study() {
  Study study = new Study(1);
  assertNotNull(study);
  assertEquals(StudyStatus.DRAFT, study.getStudyStatus(), "스터디를 처음 만들면 상태값이 DRAFT여야 한다.");
  assertTrue(study.getLimit() > 0, () -> "스터디 최대 참석 인원은 0보다 커야 합니다.");

  assertAll(
    () -> assertNotNull(study),
    () -> assertTrue(study.getLimit() > -1)
  );
  assertTimeout(Duration.ofMillis(100), () -> {
    new Study(10);
    Thread.sleep(300);
  }, "테스트가 100ms 안에 끝나야합니다.");
}
- assertEquals에서 첫번째 인자는 기대하는 값, 두번째 인자는 실제값, 세번째 인자는 테스트가 실패했을때 출력되는 메세지.
- 3번째 인자로 String을 줄수도 있고, Supplier를 넣을 수도 있다.
- assertAll으로 테스트를 한번에 실행시킬 수도 있다. 이렇게 하는 이유는 위의 테스트에서 첫번째 테스트가 깨지면 밑에 테스트는 깨졌는지 안깨졌는지 조차 알 수 없다. assertAll()을 이용하면 모든 테스트를 실행하기 때문에 어떤 테스트가 깨지는지 다 알 수 있다.
- assertThrow : 예외가 발생하는지 체크
- assertTimeout : 특정시간안에 끝나는지 확인
특정 환경에서 실행시키기
@Test
@DisplayName("특정 조건에서 테스트 실행하기")
void create_study() {
  String test_env = System.getenv("TEST_ENV");
  assumeTrue("JIMMY".equalsIgnoreCase(System.getenv("TEST_ENV"))); // LOCAL환경에서만 테스트를 실행

  assumingThat("JIMMY".equalsIgnoreCase(test_env), () -> {
    Study actual = new Study(10);
    assertThat(actual.getLimit()).isGreaterThan(0);
  });
}

@Test
@DisplayName("어노테이션으로 테스트 조건 걸기")
@DisabledOnOs(OS.MAC)
void test() {
  System.out.println("맥에서는 실행안한다.");
}

@Test
@DisplayName("어노테이션으로 테스트 조건 걸기")
@EnabledOnOs({OS.MAC, OS.LINUX})
void test2() {
  System.out.println("맥에서는 실행안한다.");
}
- env는 .zshrc에 설정한 key=value
- assumingThat을 통해 특정조건에 대해서만 테스트를 실행시킬 수 있다.
- @EnabledOnOs, @DisabledOnOs, @EnabledOnJre, @EnabledIfEnvironmentVariable 등의 어노테이션을 통해 특정조건에 대해서 테스트를 돌릴 수 있다.
Taging
    @Test
    @DisplayName("fast 태그")
    @Tag("fast")
    void fast_test() {
        System.out.println("fast test");
    }

    @Test
    @DisplayName("slow 태그")
    @Tag("slow")
    void slow_test() {
        System.out.println("slow test");
    }
- 태그에 따라서 테스트 실행 유무를 나눌수도 있다. 빌드, ci환경에서 실행하는 테스트와 로컬에서 실행하는 테스트를 나눌 수 있다.
<profiles>
        <profile>
            <id>default</id>
            <activation>
                <activeByDefault>true</activeByDefault>
            </activation>
            <build>
                <plugins>
                    <plugin>
                        <artifactId>maven-surefire-plugin</artifactId>
                        <configuration>
                            <groups>fast</groups>
                        </configuration>
                    </plugin>
                </plugins>
            </build>
        </profile>

        <profile>
            <id>ci</id>
            <activation>
                <activeByDefault>true</activeByDefault>
            </activation>
            <build>
                <plugins>
                    <plugin>
                        <artifactId>maven-surefire-plugin</artifactId>
                        <configuration>
                            <groups>fast | slow</groups>
                        </configuration>
                    </plugin>
                </plugins>
            </build>
        </profile>
    </profiles>
- profile을 설정하여 profile별로 테스트 실행하는 방법을 나눌수도 있다.
커스텀태그
-
여러개의 태그들을 조합해서 커스텀 어노테이션을 만들 수도 있다.
-
// 커스텀 어노테이션 정의
@Target(ElementType.METHOD)
@Retention(RetentionPolicy.RUNTIME)
@Test
@Tag("fast")
public @interface FastTest {
}

// 테스트 코드
@FastTest
@DisplayName("커스텀 어노테이션")
void custom_tag() {
  System.out.println("커스텀 어노테이션");
}
-
느낀점
- Junit을 그냥 써왔는데, 항상 쓰는 @Test, @BeforeAll, @AfterAll, @Before, @After 어노테이션들만 사용했었다. 강의를 들으면서 다양한 Junit기능들에 대해서 알 수 있었다. Junit 책이 있으면 자세히 한번 봐야겠다… 그동안 너무 몰랐다.
Written on December 5, 2020
